Showing posts with label Anastasia Beverly Hills. Show all posts

Tuesday, 10 January 2017

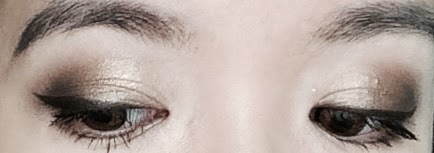
✧ Makeup look: Juvia's Place Nubian 2 eyeshadow palette ✧

Happy Tuesday everyone!

Last week I reviewed The (beautiful) Nubian 2 eyeshadow palette from Juvia's Place.


Please do check it out by clicking here for pictures and swatches! I was off to a family function that night when I reviewed it, so I decided to use the palette and see how they actually apply on the eyes. I then had a wedding dinner to attend a few days after that. So for the first look, I chose eyeshadow shades that were more suitable for daily wear and for the second look, I went for a bolder look to see how bolder colors hold up.

⎯⎯⎯⎯⎯⎯⎯⎯⎯⎯⎯⎯⎯⎯⎯⎯⎯⎯⎯⎯⎯⎯⎯⎯⎯⎯⎯⎯
↯ First look ↯
Face/Base
↬ Charlotte Tilbury Magic foundation
↬ Urban Decay Naked concealer
↬ Charlotte Tilbury Airbrush Flawless Finish powder

Contour & Blush
↬ L.A. Girl beauty brick in Spice

Highlight
↬ theBalm Mary-Lou-Manizer

Lip
↬ Huda Beauty liquid matte in Trophy Wife

Brows
↬ Etude House Drawing Eye Brow #1

Eye (The Nubian 2 eyeshadow palette)
↬ Madagascar on upper, outer crease
↬ Yaa on centre of lid
↬ Kenya + Madagascar on outer corner
↬ Yaa on inner lower lash line and Kenya on outer lower lash line

Lashes and lash line
↬ Maybelline Lash Sensational mascara
↬ Urban Decay Perversion 24/7 glide-on eye pencil


⎯⎯⎯⎯⎯⎯⎯⎯⎯⎯⎯⎯⎯⎯⎯⎯⎯⎯⎯⎯⎯⎯⎯⎯⎯⎯⎯⎯
↯ Second look ↯
Face/Base
↬ Urban Decay All Nighter liquid foundation
↬ Urban Decay Naked concealer
↬ Charlotte Tilbury Airbrush Flawless Finish powder

Contour & Blush
↬ L.A. Girl beauty brick in Spice

Highlight
↬ Anastasia Beverly Hills That Glow glow (Sunburst + Bubbly)

Lip
↬ Anastasia Beverly Hills liquid lipstick in Veronica and Allison atop

Brows
↬ Anastasia Beverly Hills Brow Wiz in Ebony

Eye (The Nubian 2 eyeshadow palette)
↬ Kenya + Madagascar on upper, outer crease
↬ Cleopatra on centre of lid
↬ Leyla + Kenya on outer corner
↬ Leyla on inner lower lash line and Nairobi on outer lower lash line

Lashes and lash line
↬ Maybelline Lash Sensational mascara
↬ Urban Decay Perversion 24/7 glide-on eye pencil


⎯⎯⎯⎯⎯⎯⎯⎯⎯⎯⎯⎯⎯⎯⎯⎯⎯⎯⎯⎯⎯⎯⎯⎯⎯⎯⎯⎯

I had fun creating the second look, because apart from the obvious blue on the centre of the lids, I added purple and gold too, which really complemented the blue by adding a pop of color. All in all, I really liked how both looks turned out! Having used this Nubian 2 palette legit made me want to get Nubian 1, which I definitely will sooner or later. The hunt for local sellers carrying that starts right about now 😁.

I hope you enjoyed reading and that this blogpost has helped you in a way or two! Please leave a comment down below if you have any thoughts or questions! Have a great week ahead of you 😄.

Gladyator signin' out.
Read More

Monday, 24 October 2016

✧ Online Haul: Anastasia Beverly Hills ✧

Happy Monday, errbadeh!

The past week has been a tad hectic. I had my graduation last two Saturdays and I'm officially a Masters holder yay *throws confetti*.  To "prepare" myself for the event, I decided to get some stuff from ABH. I saw that they were releasing their new Master Palette by Mario as well as a new liquid lipstick in the shade Allison. So... I went on and did a little damage by purchasing those two products and a liquid lipstick in the shade Veronica. Guilty not guilty!

I already own a few liquid lipsticks  (shades: Kathryn, Dusty Rose, Catnip, Ashton) from ABH from an online haul a few months back. So for this blogpost, I will combine both hauls. Here are some pictures I took!

⎯⎯⎯⎯⎯⎯⎯⎯⎯⎯⎯⎯⎯⎯⎯⎯⎯⎯⎯⎯⎯⎯⎯⎯⎯⎯⎯⎯
↯ What I got! ↯


⎯⎯⎯⎯⎯⎯⎯⎯⎯⎯⎯⎯⎯⎯⎯⎯⎯⎯⎯⎯⎯⎯⎯⎯⎯⎯⎯⎯
↯ Master Palette by Mario eyeshadow palette ↯

▶︎ (L-R) ◀︎
↬ Hollywood - a medium-toned gold shade with a slight shimmer.
↬ NYC - a reddish, bronze shade with a pearly sheen finish.
↬ Kim - a medium-toned brown shade with a tad of orange undertone and has a slight sheen finish.
↬ Muse - a medium-toned copper shade with a metallic sheen finish.
↬ Marina - a slight peachy, medium-toned champagne shade with a metallic finish.
↬ Claudia - a grayish blue metallic shade.
↬ Lula - a muted taupe matte shade. 
↬ Isabel - an orangey, terracotta shade with a matte finish.
↬ Violeta - a darker reddish brown shade with a matte finish.
↬ 5th Ave - a medium gold shade with a metallic finish,
↬ Bronx - a olive green shade with a metallic finish.
↬ Paris - a brownish, bronze shade with a frosted finish.

⎯⎯⎯⎯⎯⎯⎯⎯⎯⎯⎯⎯⎯⎯⎯⎯⎯⎯⎯⎯⎯⎯⎯⎯⎯⎯⎯⎯
↯ Liquid lipsticks↯
▶︎ (Top to bottom) ◀︎
↬ Ashton - a medium-toned brown shade.
↬ Dusty Rose - a muted, purplish pink shade.
↬ Catnip - a medium-toned purplish plum shade.
↬ Kathryn - a red shade with a pink undertone.
↬ Allison - a pinky, brown shade (which I think can pass as a darker version of Dusty Rose!).
↬ Veronica - a muted, plum-ish mauve shade.


⎯⎯⎯⎯⎯⎯⎯⎯⎯⎯⎯⎯⎯⎯⎯⎯⎯⎯⎯⎯⎯⎯⎯⎯⎯⎯⎯⎯⎯⎯⎯⎯⎯
 ☃ A little round up.. ☃


I really, really like the liquid lipsticks. On me, they aren't drying at all and they last a looong time. I once wore Kathryn to Jerudong Park, which included me having really good (and oily) food and still, the lipstick held up until the end of the night with only a tad of feathering on the outer corners of my lips. I've worn all six shades above and I like all of them. Here are some pictures of me using them! (L-R, top to bottom: Ashton, Dusty Rose, Catnip, Allison, Veronica, Kathryn)


As for the Mario eyeshadow palette, the payoff is AMAZING. I used it (in the last two pictures above) when I had rehearsals for my graduation and on the actual day of the event too. My makeup held up the entire day, despite sweating a lot throughout the day.

The eyeshadow palette is USD45 and each liquid lipstick is USD20. The shipping fee to Brunei costs approximately USD18 but the courier is UPS so your parcel is shipped directly to your house. And that only means no queuing up at the post office and getting taxed! That also means, no queuing up at the post office and getting taxed for your parcel (YAY!)!

I personally don't mind paying for the shipping fee because it is really convenient. If it's too hefty, you can always find friends who are interested in ordering so the shipping fee can be divided accordingly.

I hope this blogpost has helped you in a way or two. Please don't hesitate to leave any comments or questions down below if you have any. Thank you for reading and have a great week ahead of you!

Gladyator signin' out.
Read More

Monday, 6 October 2014

Simple Effort.

I was just asking the beau what I should call a look that I wore for his dad's birthday dinner last Wednesday. I told him the look leaned towards a simple one, but one that will look like a little effort was put in to make the whole look come together. And, he suggested Simple Effort. So I shall call it Simple Effort (tenkssss babe!!!!)!

Without further ado, here are ze pictures!


Face/Base:

↬ The Body Shop Instablur primer.
↬ Giorgio Armani Luminous Silk foundation.
↬ Garnier light BB eye roll-on.
↬ Catrice Cosmetics Prime and Fine powder.


Brows:

↬ BH Cosmetics Flawless Brow Trio in Medium.
I used Wax 1 to tame my brows and put them little fly-aways in place and proceeded to use Powder 2 to fill in visible gaps.
 ↬ Anastasia Beverly Hills tinted brow gel in Chocolate to set.


Eyes:

↬ Essence Metal Glam eyeshadow in 05 Chocolate Jewellery.
I used my ring finger to apply this over my lids and took a dabbed a little of Powder 2 (from the Flawless Brow Trio palette above) on the outer corners of the lid to create a little dimension so the eye area won't look too flat.
↬ Yves Saint Laurent Babydoll mascara.
↬ Catrice Cosmetics liquid liner in Dating Joe Black.


Lips:

↬ Revlon Colorburst Lacquer Balm in Provocateur.


The whole look took me about ten minutes so if you are in a rush to get ready, this one is for you! It's super wearable and suitable for any event, a date, a birthday dinner, or even a wedding dinner (which happens to pop up quite a lot in Brunei). Feel free to switch up the look to make it even more dramatic, depending on your liking, with chiseled cheeks, false eyelashes, thicker winged liner and a bolder lip color  ---- in which there will be a blog post dedicated to that soon!

That's all for now! Thank you for reading and please leave a comment down below if you have any questions! Have a great week ahead of youuu.

Gladyator signing out.
Read More

Monday, 8 September 2014

Paddle Pop.

Hello pretty earthlings!! Last night, my family and I threw a surprise birthday dinner for my great-aunt as it was her 80th birthday. According to Chinese tradition, when someone turns 80 years old, it calls for a grand celebration. Same goes when a baby turns exactly one month old.

So for the dinner, I decided to bust out my BH Cosmetics' Eyes On The 80's palette (since great-aunt turned 80..geddit geddit?) and use it for the very first time. I had no idea which shades to use because there are just so many to choose from, but I did end up with some pink and purple, and a speck of gold.

Without further ado, here are the products I used!


Base/Face:

  • Essence All About Matt! primer/base
  • Makeup Forever HD foundation
  • Tarte Maracuja Creaseless concealer
  • Catrice Cosmetics Prime And Fine "mattifying" powder


  • Take shade '3' first and apply on the outer V of eyelid. Slowly add and build intensity to map out the shape of the entire eye-look prior to applying other eyeshadows on entire eyelid. As opposed to applying the darkest shade last, applying it first can save you the hassle of applying everything again from the beginning if you mess up (like getting a weird "tail" of the look). I find this helpful!
  • Upon achieving the desired shape, proceed to add shade '2' to the centre of eyelid. Blend it to shade '3' to ensure that there are no obvious, harsh lines.
  • Dab with your ring finger on shade '1' and slightly apply it on the inner most corner of eyelid. This particular shade is very pigmented so applying with fingers will make it appear to be more vibrant. Also, this shade acts as a highlighting shade as the previous two shades lean towards the darker side.
  • Apply '1', '2' and '3' on lower lash line to balance out the entire eye-look, so it won't look too top-heavy.


  • Anastasia BH Dipbrow pomade in Ebony
  • Anastasia BH tinted brow gel in Chocolate
  • Catrice Cosmetics liquid liner in Dating Joe Black (thank you Nikkie!)
  • Yves Saint Laurent Babydoll mascara
  • NYX soft matte lip cream in Addis Ababa


Taken using Canon Powershot, without flash, only LED light.


Taken using iPhone 5S.
(which looks more flattering as Chrome, my default filter, really does bring out the colors!)
((which goes to show that this look is awesome because selfies using a phone is the way to go))


I guess that's it! If you have any questions or comments, please feel free to drop me a message below. I hope everyone has had a great weekend, because I certainly did! I've finally graduated from UBD on Saturday *throws confetti*. But wait, here comes Masters *picks up confetti, one by one*.

Have a great week ahead of you and as always, thank you for reading!

Read More

Friday, 29 August 2014

Naked Bronze

Hello pretty earthlings! I hope you're all well!

Urban Decay's Naked palettes have proven to be one of the holy grails to many people, including myself. Personally, I like their very first Naked palette the most because I love my bronzy, brown shades. A few weeks ago, I decided to bust out my Naked palettes to use for a Raya open house and was contemplating between Naked 1, 2 and 3. But I, of course, ended up using Naked 1 and that happens all the time! Can never say no to Half Baked in that palette.

To cut to the chase, here are the products I used!


  • MAC Face And Body foundation // Real Techniques Buffing brush.
  • Rimmel Stay Matte powder // Real Techniques Multi-Task brush.
  • theBalm Bahama Mama bronzer // Real Techniques Contour  brush.
  • Anastasia Beverly Hills Brow Wiz.
  • Dolly Wink liquid eyeliner.
  • Maybelline The Falsies mascara // Shu Eumura eyelash curler.

And here comes the main star of this blog post, the Naked Bronze look!


  1. Blended Buck onto the outer crease to create depth // Holika Holika fluffy blending brush.
  2. Applied Half Baked onto the first half of eyelid // Real Techniques Base Shadow brush.
  3. Applied Smog on centre of eyelid and blend it into Half Baked to ensure there are no obvious, harsh lines that separate both shadows // Real Techniques Base Shadow brush.
  4. Applied Dark Horse onto the outer-V of the lid and blend it into Smog to create a gradient effect (a gradient effect is a transition of a lighter shade to a darker shade) // Holika Holika fluffy blending brush.
  5. Using my ring finger, I dabbed it into Half Baked and applied it again on the first half of my eyelid (repeating step #2). This will intensify the look, as applying with your finger (with its  natural warmth) deposits more product than using a brush to do so.


  • NYX's soft matte lip cream in Monte Carlo


And here's the completed look! :)


I really think a bronzy with a smoked out eye-look is a timeless one. You can combine it with a bold lip color, like red, and it will give you a foolproof, classy evening look. You combine it with a more subtle, neutral lip color (and also applying less of the darker eyeshadow at the outer-V of the eyelid) and ta-da!, you get a more wearable, daily look.

I hope this post has helped you and as always, thank you so much for reading! Have a wonderful weekend ahead of you!

Gladyator signing out.


Read More

Monday, 11 August 2014

Tartelette!

I've officially become a Tartelette last month because of their Amazonian clay full coverage foundation. It is nothing short of amazing on my skin! I have oily skin but it has gotten much better since I amped up my skincare regime since June. A friend (also my makeup mule) helped me bring back the Tarte foundation along with their maracuja creaseless concealer. And they both work so well together. Best $99 ever spent ($60 for the foundation and $39 for the concealer at Sephora Singapore).

Last week was the beginning of Raya so I thought, what better time to open up new products and use? After my everyday skincare routine, I used a little of Benefit's POREfessional as a base and then applied the Tarte foundation using a damp Real Techniques' Miracle Complexion sponge and it is a (much cheaper) dupe to the original Beauty Blender. The foundation is really easy to blend and it is build-able, so you can layer or pack on if you like a fuller coverage. I only applied one layer because 1) I wanted to see how one layer holds up and 2) I wanted a more natural look because it was day-time. After applying the foundation, I dabbed a little bit of the maracuja creaseless concealer on my under-eye circles and I kid you not, you only need the tiniest bit because a little goes a long way and it has a thick consistency. I decided not to use any powder because again, I wanted it to be light.

I started wearing the foundation at about four in the afternoon and actually had a pretty long night (inclusive of sweating like mad at a basketball match with many people sweating like mad too). When I got home around midnight, the foundation still looked good. And that was when I decided that the foundation is. amazing. 


Tarte's Amazonian clay full coverage foundation
Tarte's Maracuja Creaseless concealer


Benefit's They're Real! push-up liner


Revlon's Lash Potion mascara
Anastasia Beverly Hills Brow Wiz


NYX soft matte lip cream in Prague on my lips


I just realised I don't usually use any false eyelashes or blushes. I should probably start investing in some (any reason to shop for more makeup...)!

Anyway, thank you for reading and have a great weekend ahead of you!!

Gladyator signing out.


Read More

Wednesday, 16 July 2014

Selfish Silver Smoke

Hello pretty earthlings! I attended a dinner last Saturday, the 12th. I initially wanted to use the Naked 1 palette because it's my all time favourite, but I saw my unopened-still-in-its-plastic-bag NudeTude palette so I think I might as well make use of it!

From the title of this post, it needs no pointing-out that I made this eye look on the one shade that caught my eye, Selfish, a silvery taupe shade. Hence it is the main color of this look. The products I used are as below :D


Face/Base


  • Benefit the POREfessional primer
  • Yves Saint Lauret Le Teint Touche Éclat foundation
  • NYX Above & Beyond Coverage concealer
  • Rimmel Stay Matte pressed powder
  • theBalm Mary-Lou Manizer as a highlighter
  • theBalm Betty-Lou Manizer as a bronzer
  • Sleek Blush by 3 in pink lemonade

Eyes


      Shadows:
  • Applied Selfish from the inner corners to the middle of eyelid, leaving the outer corner bare
  • Lightly tapped brush onto Serious and put it on the outer crease of eyelid, blending inwards together with Selfish
  • Used my ring finger to apply a little hint of Stand-offish on the middle of eyelid to give that extra pop and dimension so the entire eye look won't look too flat
      Rest of the eye area:
  • Bobbi Brown long-wear gel eyeliner in Black Ink
  • Shu Eumura eyelash curler
  • Revlon Lash Potion mascara
  • Anastasia Beverly Hills Brow Wiz in Ebony

Lips


  • NYX soft matte lip cream in Prague

Brushes


  • Foundation - Real Techniques buffing brush
  • Concealer - Real Techniques domed shadow brush
  • Powder - Real Techniques multitask brush
  • Eyeshadows - Real Techniques base shadow brush
  • Eyeliner - Real Techniques fine liner brush
  • Bronzer - Real Techniques contour brush

Final look!


I really liked how everything turned out in the end, nothing too fancy and yet nothing too..simple. I hope you had a great weekend and here's to another one!

Gladyator signing out.
Read More

Wednesday, 9 July 2014

Bronzed.

Hi everyone! I attended a wedding last fortnight and I did a look which is always my all-time favourite, featuring my all-time favourite shade, brown! I think this will suit most eye colors because you can always either play it up by packing more eyeshadow, or warm it down by putting on less initially. Without further ado, here are what I used :)

Face/Base


  • Benefit the POREfessional primer
  • Yves Saint Lauret Le Teint Touche Éclat foundation
  • NYX Above & Beyond Coverage concealer
  • Rimmel Stay Matte pressed powder

Eyes


  • Em Cosmetics Shade Play in Bali Bronzes
    • Shade 1 on the inner corner, shades 2+3 on centre of eyelids and 4 on the outer V. Blend appropriately to ensure that there are no harsh edges.
  • Shu Eumura eyelash curler
  • Maybelline The Rocket mascara
  • Dolly Wink liquid eyeliner in Deep Black
  • Anastasia Beverly Hills Brow Wiz in Ebony

Lips


  • NYX soft matte lip cream in Prague

Brush

(Right to left)
  • Sigma F82 round kabuki brush [to apply foundation]
  • Sigma F30 large powder brush [to set foundation with powder]
  • Sigma E40 tapered blending brush [to blend eyeshadows]
  • Sigma E55 eyeshading brush [to apply eyeshadows]

When all is put together....


I hope this post helped you in a way or another. If you have any questions, don't hesitate to post them down below in the comments section! Thank you for reading!

Gladyator signing out.


Read More
Powered by Blogger.

About me

Instagram

Pages

recent posts

Pinterest

Flickr Images

Like us on Facebook